Python在科研中的应用 03:科学计算环境 NumPy

Numpy是Python中科学计算的核心库。它提供了一个多维数组对象,以及用于高并发处理这些数组的向量化计算工具集。NumPy允许用户在Python环境中进行向量和矩阵计算,并且由于许多底层函数实际上是用C编写的,因此你可以体验在原生Python中永远无法体验到的速度。NumPy绝对是Python在科学计算领域成功的关键之一,如果你想要进入Python中的数据科学或机器学习,你就要必须学习它。Have a good day!

创建数组

NumPy数组是一个值网格,所有类型都相同,并由非负整数元组索引。创建数组通常有5种常规机制:

  • 从其他Python结构(例如,列表,元组,array_like)转换
  • numpy原生数组的创建(例如,arange、ones、zeros等)
  • 从磁盘读取数组,无论是标准格式还是自定义格式
  • 通过使用字符串或缓冲区从原始字节创建数组
  • 使用特殊库函数(例如,random)

直接创建

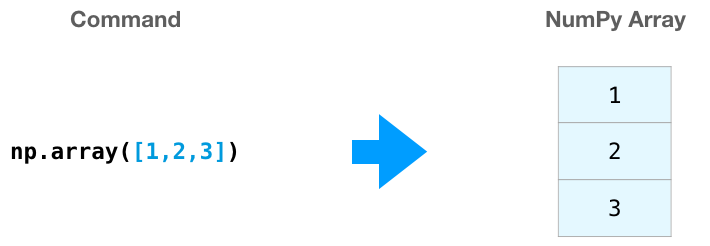
通常,在Python中排列成array-like结构的数值数据可以通过使用array()函数转换为数组。最明显的例子是列表和元组。np.array() 直接创建:

1
2
3
import numpy as np

a = np.array([1,2,3])
np.array()创建数组

对于一维数组,我们在写数组的时候是横着写的,而其实数组是列向量。

内置函数创建

Numpy内置了从头开始创建数组的函数,zeros()将创建一个用指定形状用0填充的数组。默认的dtypefloat64。使用 np.ones()、np.zeros()、np.random.random() 等方法:

np.ones(), np.zeros(), np.random.random()创建数组

NumPy同样可以创建多维数组。数组的形状(shape)是一个整数元组,给出了每个维度的数组大小。我们可以从嵌套的Python列表初始化NumPy数组,并使用方括号访问元素:

1
2
3
4
5
6
7
8
9
10
11
12
import numpy as np

a = np.array([1, 2, 3]) # Create a rank 1 array
print(type(a)) # Prints "<class 'numpy.ndarray'>"
print(a.shape) # Prints "(3,)"
print(a[0], a[1], a[2]) # Prints "1 2 3"
a[0] = 5 # Change an element of the array
print(a) # Prints "[5, 2, 3]"

b = np.array([[1,2,3],[4,5,6]]) # Create a rank 2 array
print(b.shape) # Prints "(2, 3)"
print(b[0, 0], b[0, 1], b[1, 0]) # Prints "1 2 4"

我们再来看一些例子:

1
2
3
4
5
6
7
8
9
10
11
12
import numpy as np

a = np.array([0, 1, 2, 3, 4])
b = np.array((0, 1, 2, 3, 4))
c = np.arange(5)
d = np.linspace(0, 2*np.pi, 5)

print(a) # >>>[0 1 2 3 4]
print(b) # >>>[0 1 2 3 4]
print(c) # >>>[0 1 2 3 4]
print(d) # >>>[ 0. 1.57079633 3.14159265 4.71238898 6.28318531]
print(a[3]) # >>>3

上面的代码显示了创建数组的4种不同方法。最基本的方法是将序列传递给NumPy的array()函数; 你可以传递任何序列(类数组),而不仅仅是常见的列表(list)数据类型。

1
2
3
4
5
6
7
8
>>>np.arange(3)
array([0, 1, 2])
>>>np.arange(3.0)
array([ 0., 1., 2.])
>>>np.arange(3,7)
array([3, 4, 5, 6])
>>>np.arange(3,7,2)
array([3, 5])

np.arange()函数对于整数参数,该函数大致相当于Python内置的range()。当使用非整数步长(例如0.1)时,通常使用numpy.linspace更好。

1
numpy.linspace(start, stop, num=50, endpoint=True, retstep=False, dtype=None, axis=0)
  • start: array_like 序列的起始值;
  • stop: array_like 序列的结束值,除非endpoint被设置为False。在这种情况下,序列由除num+1个均匀间隔样本的最后一个之外的所有样本组成,因此stop值被排除在外。注意,当endpoint为False时,步长会发生变化。
  • num: int 可选项,要生成的样本数量,默认值是50,必须为非负整数;
  • endpoint: bool 可选项,如果为True,则最后一个元素为stop值,否则不包含。默认为True;
  • retstep: bool 可选项,如果True,返回(samples, step),其中step是采样之间的间隔。
  • dtype: dtype 可选项,输出数组的数据类型。如果不指定dtype,则从start和stop推断数据类型。推断的dtype永远不会是整型;即使参数将产生一个整数数组,也选择float。
  • axis: int 可选项,1.9.0新版功能。Axis在结果中存储样品。只有当start或stop是数组类型时才相关。默认情况下(0),样本将沿着在开始时插入的新轴。用-1得到最后的轴。

这个创建函数的优点是可以保证元素的数量以及开始和结束点,对于任意的开始,停止和步骤值,arange()通常不会这样做。

1
2
3
4
5
6
>>>np.linspace(2.0, 3.0, num=5)
array([2. , 2.25, 2.5 , 2.75, 3. ])
>>>np.linspace(2.0, 3.0, num=5, endpoint=False)
array([2. , 2.2, 2.4, 2.6, 2.8])
>>>np.linspace(2.0, 3.0, num=5, retstep=True)
(array([2. , 2.25, 2.5 , 2.75, 3. ]), 0.25)

同样类似的函数还有geomspace()以及logspace(),功能与linspace()函数类似,分别对应生成指数级数与对数级数数组,在此不做过多介绍。

创建多维数组

上面的数组示例是如何使用NumPy表示向量的,接下来我们将看看如何使用多维数组表示矩阵和更多的信息。

1
2
3
4
5
6
7
8
9
import numpy as np

a = np.array([[11, 12, 13, 14, 15],
[16, 17, 18, 19, 20],
[21, 22, 23, 24, 25],
[26, 27, 28 ,29, 30],
[31, 32, 33, 34, 35]])

print(a[2,4]) # >>>25

为了创建一个二维数组,我们传递一个列表的列表(或者是一个序列的序列)给array()函数。如果我们想要一个3D(三维)数组,我们就要传递一个列表的列表的列表,如果是一个4D(四维)数组,那就是列表的列表的列表的列表,以此类推。请注意2D(二维)数组是如何按行和列排列的。要索引2D(二维)数组,我们只需引用行数和列数即可。

我们再来看看一些二维情况下创建数组的例子:

1
2
3
4
5
6
7
8
9
10
11
12
13
14
15
16
17
18
19
20
import numpy as np

a = np.zeros((2,2)) # Create an array of all zeros
print(a) # Prints "[[ 0. 0.]
# [ 0. 0.]]"

b = np.ones((1,2)) # Create an array of all ones
print(b) # Prints "[[ 1. 1.]]"

c = np.full((2,2), 7) # Create a constant array
print(c) # Prints "[[ 7. 7.]
# [ 7. 7.]]"

d = np.eye(2) # Create a 2x2 identity matrix
print(d) # Prints "[[ 1. 0.]
# [ 0. 1.]]"

e = np.random.random((2,2)) # Create an array filled with random values
print(e) # Might print "[[ 0.91940167 0.08143941]
# [ 0.68744134 0.87236687]]"

数组属性

在使用NumPy时,你会想知道数组的某些信息。很幸运,NumPy包里边包含了很多便捷的方法,可以给你想要的信息。

1
2
3
4
5
6
7
8
9
10
11
12
13
14
# Array properties
a = np.array([[11, 12, 13, 14, 15],
[16, 17, 18, 19, 20],
[21, 22, 23, 24, 25],
[26, 27, 28 ,29, 30],
[31, 32, 33, 34, 35]])

print(type(a)) # >>><class 'numpy.ndarray'>
print(a.dtype) # >>>int64
print(a.size) # >>>25
print(a.shape) # >>>(5, 5)
print(a.itemsize) # >>>8
print(a.ndim) # >>>2
print(a.nbytes) # >>>200

正如你在上面的代码中看到的,NumPy数组实际上被称为'numpy.ndarray'

  • shape属性是数组有多少行和列,上面的数组有5行和5列,所以它的shape是(5, 5)。

  • itemsize属性是每个项占用的字节(Byte)数。这个数组的数据类型是int64,一个int64中有64 bit,1 byte = 8 bit,即为8 byte。

  • ndim属性是数组的维数,在本例中为2。

  • nbytes属性是数组中的所有数据消耗掉的字节数。这并不计算数组信息定义开销,因此数组占用的实际内存空间将稍微大一点。

数据类型

每个NumPy数组都是相同类型元素的网格。NumPy提供了一组可用于构造数组的大量数值数据类型。NumPy在创建数组时尝试猜测数据类型,但构造数组的函数通常还包含一个可选参数来显式指定数据类型。这是一个例子:

1
2
3
4
5
6
7
8
9
10
import numpy as np

x = np.array([1, 2]) # Let numpy choose the datatype
print(x.dtype) # Prints "int64"

x = np.array([1.0, 2.0]) # Let numpy choose the datatype
print(x.dtype) # Prints "float64"

x = np.array([1, 2], dtype=np.int64) # Force a particular datatype
print(x.dtype) # Prints "int64"

NumPy支持比Python更多种类的数字类型。本节显示了哪些可用,以及如何修改数组的数据类型。支持的原始类型与 C 中的原始类型紧密相关:

NumPy数据类型1

由于其中许多都具有依赖于平台的定义,因此提供了一组固定大小的别名:

NumPy数据类型2

NumPy数值类型是dtype(数据类型)对象的实例,每个对象都具有独特的特征。导入NumPy后使用,在dtypes可作为np.bool_np.float32等等。

上表中未列出的高级类型将在后续的课程中教授结构化数组时进行探讨。

有5种基本数字类型表示布尔值(bool),整数(int),无符号整数(uint)浮点(float)和复数(complex)。名称中带有数字的那些表示该类型的位大小(即,在内存中表示单个值需要多少位)。某些类型(例如intintp)具有不同的位,取决于平台(例如,32位与64位计算机)。在与寻址原始内存的低层代码(例如C或Fortran)连接时,应考虑这一点。

数据类型可以用作将Python数转换为数组标量的函数,将Python数字序列转换为该类型的数组,或作为许多NumPy函数或方法接受的dtype关键字的参数。一些例子:

1
2
3
4
5
6
7
8
9
10
11
>>> import numpy as np

>>> x = np.float32(1.0)
>>> x
1.0
>>> y = np.int_([1,2,4])
>>> y
array([1, 2, 4])
>>> z = np.arange(3, dtype=np.uint8)
>>> z
array([0, 1, 2], dtype=uint8)

数组类型也可以通过字符代码引用,主要是为了保持与较旧的包(如Numeric)的向后兼容性。有些文档可能仍然引用这些,例如:

1
2
>>> np.array([1, 2, 3], dtype='f')
array([ 1., 2., 3.], dtype=float32)

但我们仍然建议使用dtype对象。

要转换数组的类型,请使用 .astype() 方法(首选)或类型本身作为函数。例如:

1
2
3
4
>>> z.astype(float)                 
array([ 0., 1., 2.])
>>> np.int8(z)
array([0, 1, 2], dtype=int8)

注意,在上面,我们使用 Python 的float对象作为dtype。NumPy中int是指np.int_bool意味着np.bool_floatnp.float_complexnp.complex_。其他数据类型没有Python等价物。

要确定数组的类型,请查看dtype属性:

1
2
>>> z.dtype
dtype('uint8')

dtype对象还包含有关类型的信息,例如其位宽和字节顺序。数据类型也可以间接用于查询类型的属性,例如它是否为整数:

1
2
3
4
5
6
7
8
9
>>> d = np.dtype(int)
>>> d
dtype('int32')

>>> np.issubdtype(d, np.integer)
True

>>> np.issubdtype(d, np.floating)
False

数组标量

NumPy通常将数组元素作为数组标量返回(带有关联dtype的标量)。数组标量与Python标量不同,但在大多数情况下它们可以互换使用(主要的例外是早于v2.x的Python版本,其中整数数组标量不能作为列表和元组的索引)。有一些例外,例如当代码需要标量的非常特定的属性或者它特定地检查值是否是Python标量时。通常,存在的问题很容易被显式转换数组标量到Python标量,采用相应的Python类型的功能(例如,固定的intfloatcomplexstrunicode)。

使用数组标量的主要优点是它们保留了数组类型(Python可能没有匹配的标量类型,例如int16)。因此,使用数组标量可确保数组和标量之间的相同行为,无论值是否在数组内。NumPy标量也有许多与数组相同的方法。

溢出错误

当值需要比数据类型中的可用内存更多的内存时,NumPy数值类型的固定大小可能会导致溢出错误。例如,numpy.power对于int64可以正确计算 100 * 10 * 8,但对于int32给出1874919424(不正确)。

1
2
3
4
>>> np.power(100, 8, dtype=np.int64)
10000000000000000
>>> np.power(100, 8, dtype=np.int32)
1874919424

NumPy和Python整数类型的行为在整数溢出方面存在显着差异,并且可能会使用户期望NumPy整数的行为类似于Python中的int。与 NumPy 不同,Python本体的int是灵活的。这意味着Python整数可以扩展以容纳任何整数并且不会溢出。

NumPy分别提供numpy.iinfonumpy.finfo验证NumPy整数和浮点值的最小值或最大值:

1
2
3
4
5
6
>>> np.iinfo(np.int) # Bounds of the default integer on this system.
iinfo(min=-9223372036854775808, max=9223372036854775807, dtype=int64)
>>> np.iinfo(np.int32) # Bounds of a 32-bit integer
iinfo(min=-2147483648, max=2147483647, dtype=int32)
>>> np.iinfo(np.int64) # Bounds of a 64-bit integer
iinfo(min=-9223372036854775808, max=9223372036854775807, dtype=int64)

如果int64仍然太小,则结果可能会转换为浮点数。浮点数提供了更大但不精确的可能值范围。

1
2
3
4
>>> np.power(100, 100, dtype=np.int64) # Incorrect even with 64-bit int
0
>>> np.power(100, 100, dtype=np.float64)
1e+200

扩展精度

Python 的浮点数通常是64位浮点数,几乎等同于np.float64。在某些不寻常的情况下,使用更精确的浮点数可能会很有用。这在numpy中是否可行取决于硬件和开发环境:具体地说,x86机器提供80位精度的硬件浮点,虽然大多数C编译器提供这一点作为它们的long double类型,MSVC(Windows构建的标准)使long double等同于double(64位)。NumPy使编译器的long double作为np.longdouble可用(而np.clongdouble用于复数)。

NumPy不提供比C的long double更高精度的dtype;特别是128位IEEE四精度数据类型(FORTRAN的 REAL*16 )不可用。

为了有效地进行内存的校准,np.longdouble通常以零位进行填充,即96或者128位,哪个更有效率取决于硬件和开发环境;通常在32位系统上它们被填充到96位,而在64位系统上它们通常被填充到128位。np.longdouble被填充到系统默认值;为需要特定填充的用户提供了np.float96np.float128。尽管它们的名称是这样叫的, 但是np.float96np.float128只提供与np.longdouble一样的精度, 即大多数x86机器上的80位和标准Windows版本中的64位。

请注意,即使np.longdouble提供比Python中float更多的精度,也很容易失去额外的精度,因为Python通常强制值通过float传递值。

数组索引

NumPy提供了几种索引数组的方法。

单元素索引

人们期望的是1-D数组的单元素索引。它的工作方式与其他标准Python序列完全相同。它从0开始计数,并接受从数组末尾开始索引的负索引。

1
2
3
4
5
>>> x = np.arange(10)
>>> x[2]
2
>>> x[-2]
8

与列表和元组不同,NumPy数组支持多维数组的多维索引。这意味着没有必要将每个维度的索引分成它自己的一组方括号。

1
2
3
4
5
>>> x.shape = (2,5) # now x is 2-dimensional
>>> x[1,3]
8
>>> x[1,-1]
9

请注意,如果索引索引比维度少的多维数组,则会获得一个子维数组。例如:

1
2
>>> x[0]
array([0, 1, 2, 3, 4])

也就是说,指定的每个索引选择与所选维度的其余部分对应的数组。在上面的示例中,选择0表示长度为5的剩余维度未指定,返回的是该维度和大小的数组。必须注意的是,返回的数组不是原始数据的副本,而是指向内存中与原始数组相同的值。在这种情况下,返回第一个位置(0)的1-D数组。因此,在返回的数组上使用单个索引会导致返回单个元素。那是:

1
2
>>> x[0][2]
2

请注意,尽管第二种情况效率较低,因为在第一个索引之后创建了一个新的临时数组,该索引随后被索引为2:x[0,2] = x[0][2]

切片索引(Slicing)

与Python列表类似,可以对NumPy数组进行切片。由于数组可能是多维的,因此必须为数组的每个维指定一个切片:

1
2
3
4
5
6
7
8
9
10
11
12
13
14
15
16
import numpy as np

a = np.array([[1, 2, 3, 4], # Create the following rank 2 array with shape (3, 4)
[5, 6, 7, 8],
[9,10,11,12]])

b = a[:2, 1:3] # Use slicing to pull out the subarray consisting of the first 2 rows and columns 1 and 2;
print(b) # b is the following array of shape (2, 2):
# [[2 3]
# [6 7]]

# A slice of an array is a view into the same data, so modifying it
# will modify the original array.
print(a[0, 1]) # Prints "2"
b[0, 0] = 77 # b[0, 0] is the same piece of data as a[0, 1]
print(a[0, 1]) # Prints "77"

你还可以将整数索引与切片索引混合使用。 但是,这样做会产生比原始数组更低级别的数组。 请注意,这与MATLAB处理数组切片的方式完全不同:

1
2
3
4
5
6
7
8
9
10
11
12
13
14
15
16
17
18
19
20
21
22
import numpy as np

a = np.array([[1, 2, 3, 4],
[5, 6, 7, 8],
[9,10,11,12]])

# Two ways of accessing the data in the middle row of the array.
# Mixing integer indexing with slices yields an array of lower rank,
# while using only slices yields an array of the same rank as the
# original array:
row_r1 = a[1, :] # Rank 1 view of the second row of a
row_r2 = a[1:2, :] # Rank 2 view of the second row of a
print(row_r1, row_r1.shape) # Prints "[5 6 7 8] (4,)"
print(row_r2, row_r2.shape) # Prints "[[5 6 7 8]] (1, 4)"

# We can make the same distinction when accessing columns of an array:
col_r1 = a[:, 1]
col_r2 = a[:, 1:2]
print(col_r1, col_r1.shape) # Prints "[ 2 6 10] (3,)"
print(col_r2, col_r2.shape) # Prints "[[ 2]
# [ 6]
# [10]] (3, 1)"

整数数组索引

使用切片索引到NumPy数组时,生成的数组视图将始终是原始数组的子数组。 相反,整数数组索引允许你使用另一个数组中的数据构造任意数组。 这是一个例子:

1
2
3
4
5
6
7
8
9
10
11
12
13
14
15
16
17
18
19
import numpy as np

a = np.array([[1, 2],
[3, 4],
[5, 6]])

# An example of integer array indexing.
# The returned array will have shape (3,) and
print(a[[0, 1, 2], [0, 1, 0]]) # Prints "[1 4 5]"

# The above example of integer array indexing is equivalent to this:
print(np.array([a[0, 0], a[1, 1], a[2, 0]])) # Prints "[1 4 5]"

# When using integer array indexing, you can reuse the same
# element from the source array:
print(a[[0, 0], [1, 1]]) # Prints "[2 2]"

# Equivalent to the previous integer array indexing example
print(np.array([a[0, 1], a[0, 1]])) # Prints "[2 2]"

整数数组索引的一个有用技巧是从矩阵的每一行中选择或改变一个元素:

1
2
3
4
5
6
7
8
9
10
11
12
13
14
15
16
17
18
19
20
21
import numpy as np

# Create a new array from which we will select elements
a = np.array([[ 1, 2, 3],
[ 4, 5, 6],
[ 7, 8, 9],
[10,11,12]])

# Create an array of indices
b = np.array([0, 2, 0, 1])

# Select one element from each row of a using the indices in b
print(a[np.arange(4), b]) # Prints "[ 1 6 7 11]"

# Mutate one element from each row of a using the indices in b
a[np.arange(4), b] += 10

print(a) # prints "array([[11, 2, 3],
# [ 4, 5, 16],
# [17, 8, 9],
# [10, 21, 12]])

布尔数组索引

布尔数组索引允许你选择数组的任意元素。通常,这种类型的索引用于选择满足某些条件的数组元素。下面是一个例子:

1
2
3
4
5
6
7
8
9
10
11
12
13
14
15
16
17
18
19
20
import numpy as np

a = np.array([[1,2], [3, 4], [5, 6]])

bool_idx = (a > 2) # Find the elements of a that are bigger than 2;
# this returns a numpy array of Booleans of the same
# shape as a, where each slot of bool_idx tells
# whether that element of a is > 2.

print(bool_idx) # Prints "[[False False]
# [ True True]
# [ True True]]"

# We use boolean array indexing to construct a rank 1 array
# consisting of the elements of a corresponding to the True values
# of bool_idx
print(a[bool_idx]) # Prints "[3 4 5 6]"

# We can do all of the above in a single concise statement:
print(a[a > 2]) # Prints "[3 4 5 6]"

广播(Broadcasting)

广播是一种强大的机制,它允许NumPy在执行算术运算时使用不同形状的数组。通常,我们有一个较小的数组和一个较大的数组,我们希望多次使用较小的数组来对较大的数组执行一些操作。

例如,假设我们要向矩阵的每一行添加一个常数向量。我们可以这样做:

1
2
3
4
5
6
7
8
9
10
11
12
13
14
15
16
17
18
import numpy as np

# We will add the vector v to each row of the matrix x,
# storing the result in the matrix y
x = np.array([[1,2,3], [4,5,6], [7,8,9], [10, 11, 12]])
v = np.array([1, 0, 1])
y = np.empty_like(x) # Create an empty matrix with the same shape as x

# Add the vector v to each row of the matrix x with an explicit loop
for i in range(4):
y[i, :] = x[i, :] + v

# Now y is the following
# [[ 2 2 4]
# [ 5 5 7]
# [ 8 8 10]
# [11 11 13]]
print(y)

这会凑效; 但是当矩阵 x 非常大时,在Python中计算显式循环可能会很慢。注意,向矩阵 x 的每一行添加向量 v 等同于通过垂直堆叠多个 v 副本来形成矩阵 vv,然后执行元素的求和x 和 vv。 我们可以像如下这样实现这种方法:

1
2
3
4
5
6
7
8
9
10
11
12
13
14
15
16
import numpy as np

# We will add the vector v to each row of the matrix x,
# storing the result in the matrix y
x = np.array([[1,2,3], [4,5,6], [7,8,9], [10, 11, 12]])
v = np.array([1, 0, 1])
vv = np.tile(v, (4, 1)) # Stack 4 copies of v on top of each other
print(vv) # Prints "[[1 0 1]
# [1 0 1]
# [1 0 1]
# [1 0 1]]"
y = x + vv # Add x and vv elementwise
print(y) # Prints "[[ 2 2 4
# [ 5 5 7]
# [ 8 8 10]
# [11 11 13]]"

NumPy广播允许我们在不实际创建v的多个副本的情况下执行此计算。考虑这个需求,使用广播如下:

1
2
3
4
5
6
7
8
9
10
11
import numpy as np

# We will add the vector v to each row of the matrix x,
# storing the result in the matrix y
x = np.array([[1,2,3], [4,5,6], [7,8,9], [10, 11, 12]])
v = np.array([1, 0, 1])
y = x + v # Add v to each row of x using broadcasting
print(y) # Prints "[[ 2 2 4]
# [ 5 5 7]
# [ 8 8 10]
# [11 11 13]]"

y=x+v行即使x具有形状(4,3)和v具有形状(3,),但由于广播的关系,该行的工作方式就好像v实际上具有形状(4,3),其中每一行都是v的副本,并且求和是按元素执行的。

将两个数组一起广播遵循以下规则:

  • 如果数组不具有相同的rank,则将较低等级数组的形状添加1,直到两个形状具有相同的长度。
  • 如果两个数组在维度上具有相同的大小,或者如果其中一个数组在该维度中的大小为1,则称这两个数组在维度上是兼容的。
  • 如果数组在所有维度上兼容,则可以一起广播。
  • 广播之后,每个数组的行为就好像它的形状等于两个输入数组的形状的元素最大值。
  • 在一个数组的大小为1且另一个数组的大小大于1的任何维度中,第一个数组的行为就像沿着该维度复制一样

支持广播的功能称为通用功能。

以下是广播的一些应用:

1
2
3
4
5
6
7
8
9
10
11
12
13
14
15
16
17
18
19
20
21
22
23
24
25
26
27
28
29
30
31
32
33
34
35
36
37
38
39
40
41
42
import numpy as np

# Compute outer product of vectors
v = np.array([1,2,3]) # v has shape (3,)
w = np.array([4,5]) # w has shape (2,)
# To compute an outer product, we first reshape v to be a column
# vector of shape (3, 1); we can then broadcast it against w to yield
# an output of shape (3, 2), which is the outer product of v and w:
# [[ 4 5]
# [ 8 10]
# [12 15]]
print(np.reshape(v, (3, 1)) * w)

# Add a vector to each row of a matrix
x = np.array([[1,2,3], [4,5,6]])
# x has shape (2, 3) and v has shape (3,) so they broadcast to (2, 3),
# giving the following matrix:
# [[2 4 6]
# [5 7 9]]
print(x + v)

# Add a vector to each column of a matrix
# x has shape (2, 3) and w has shape (2,).
# If we transpose x then it has shape (3, 2) and can be broadcast
# against w to yield a result of shape (3, 2); transposing this result
# yields the final result of shape (2, 3) which is the matrix x with
# the vector w added to each column. Gives the following matrix:
# [[ 5 6 7]
# [ 9 10 11]]
print((x.T + w).T)
# Another solution is to reshape w to be a column vector of shape (2, 1);
# we can then broadcast it directly against x to produce the same
# output.
print(x + np.reshape(w, (2, 1)))

# Multiply a matrix by a constant:
# x has shape (2, 3). Numpy treats scalars as arrays of shape ();
# these can be broadcast together to shape (2, 3), producing the
# following array:
# [[ 2 4 6]
# [ 8 10 12]]
print(x * 2)

广播通常会使你的代码更简洁,效率更高,因此你应该尽可能地使用它。

数组中的基本数学

基本数学函数在数组上以元素方式运行,既可以作为运算符重载,也可以作为NumPy模块中的函数:

1
2
3
4
5
6
7
8
9
10
11
12
13
14
15
16
17
18
19
20
21
22
23
24
25
26
27
28
29
30
31
32
33
import numpy as np

x = np.array([[1,2],[3,4]], dtype=np.float64)
y = np.array([[5,6],[7,8]], dtype=np.float64)

# Elementwise sum; both produce the array
# [[ 6.0 8.0]
# [10.0 12.0]]
print(x + y)
print(np.add(x, y))

# Elementwise difference; both produce the array
# [[-4.0 -4.0]
# [-4.0 -4.0]]
print(x - y)
print(np.subtract(x, y))

# Elementwise product; both produce the array
# [[ 5.0 12.0]
# [21.0 32.0]]
print(x * y)
print(np.multiply(x, y))

# Elementwise division; both produce the array
# [[ 0.2 0.33333333]
# [ 0.42857143 0.5 ]]
print(x / y)
print(np.divide(x, y))

# Elementwise square root; produces the array
# [[ 1. 1.41421356]
# [ 1.73205081 2. ]]
print(np.sqrt(x))

请注意,与MATLAB不同,*是元素乘法,而不是矩阵乘法。 我们使用dot函数来计算向量的内积,将向量乘以矩阵。 dot既可以作为NumPy模块中的函数,也可以作为数组对象的实例方法:

1
2
3
4
5
6
7
8
9
10
11
12
13
14
15
16
17
18
19
20
21
import numpy as np

x = np.array([[1,2],[3,4]])
y = np.array([[5,6],[7,8]])

v = np.array([9,10])
w = np.array([11, 12])

# Inner product of vectors; both produce 219
print(v.dot(w))
print(np.dot(v, w))

# Matrix / vector product; both produce the rank 1 array [29 67]
print(x.dot(v))
print(np.dot(x, v))

# Matrix / matrix product; both produce the rank 2 array
# [[19 22]
# [43 50]]
print(x.dot(y))
print(np.dot(x, y))

NumPy为在数组上执行计算提供了许多有用的函数;其中最常用的函数之一是求和函数sum

1
2
3
4
5
6
7
import numpy as np

x = np.array([[1,2],[3,4]])

print(np.sum(x)) # Compute sum of all elements; prints "10"
print(np.sum(x, axis=0)) # Compute sum of each column; prints "[4 6]"
print(np.sum(x, axis=1)) # Compute sum of each row; prints "[3 7]"

除了使用数组计算数学函数外,我们经常需要对数组中的数据进行整形或其他操作。这种操作的最简单的例子是转置一个矩阵;要转置一个矩阵,只需使用一个数组对象的T属性:

1
2
3
4
5
6
7
8
9
10
11
12
import numpy as np

x = np.array([[1,2], [3,4]])
print(x) # Prints "[[1 2]
# [3 4]]"
print(x.T) # Prints "[[1 3]
# [2 4]]"

# Note that taking the transpose of a rank 1 array does nothing:
v = np.array([1,2,3])
print(v) # Prints "[1 2 3]"
print(v.T) # Prints "[1 2 3]"

点积运算原理

数组特殊运算符

NumPy还提供了一些别的用于处理数组的好用的运算符。

1
2
3
4
5
6
7
# dot, sum, min, max, cumsum
a = np.arange(10)

print(a.sum()) # >>>45
print(a.min()) # >>>0
print(a.max()) # >>>9
print(a.cumsum()) # >>>[ 0 1 3 6 10 15 21 28 36 45]

sum()、min()和max()函数的作用非常明显。将所有元素相加,找出最小和最大元素。

然而,cumsum()函数就不那么明显了。它将像sum()这样的每个元素相加,但是它首先将第一个元素和第二个元素相加,并将计算结果存储在一个列表中,然后将该结果添加到第三个元素中,然后再将该结果存储在一个列表中。这将对数组中的所有元素执行此操作,并返回作为列表的数组之和的运行总数。

Where 函数

where() 函数是一个根据条件返回数组中的值的有效方法。只需要把条件传递给它,它就会返回一个使得条件为真的元素的列表。

1
2
3
4
5
6
# Where
a = np.arange(0, 100, 10)
b = np.where(a < 50)
c = np.where(a >= 50)[0]
print(b) # >>>(array([0, 1, 2, 3, 4]),)
print(c) # >>>[5 6 7 8 9]

字节交换

字节排序和ndarrays简介

ndarray是一个为内存中的数据提供python数组接口的对象。经常发生的情况是,要用数组查看的内存与运行Python的计算机的字节顺序不同。

例如,我可能正在使用带有 little-endian CPU 的计算机 - 例如Intel Pentium,但是我已经从一个由 big-endian计算机 编写的文件中加载了一些数据。假设我已经从Sun(big-endian)计算机写入的文件中加载了4个字节。我知道这4个字节代表两个16位整数。在 big-endian 机器上,首先以最高有效字节(MSB)存储双字节整数,然后存储最低有效字节(LSB)。因此字节按内存顺序排列:

1
2
3
4
MSB整数1
LSB整数1
MSB整数2
LSB整数2

假设两个整数实际上是1和770.因为770 = 256 * 3 + 2,内存中的4个字节将分别包含:0,1,3,2。我从文件加载的字节将包含这些内容:

1
2
3
>>> big_end_buffer = bytearray([0,1,3,2])
>>> big_end_buffer
bytearray(b'\x00\x01\x03\x02')

我们可能需要使用 ndarray 来访问这些整数。在这种情况下,我们可以围绕这个内存创建一个数组,并告诉numpy有两个整数,并且它们是16位和Big-endian:

1
2
3
4
5
6
>>> import numpy as np
>>> big_end_arr = np.ndarray(shape=(2,),dtype='>i2', buffer=big_end_buffer)
>>> big_end_arr[0]
1
>>> big_end_arr[1]
770

注意上面的数组dtype > i2> 表示 big-endian( < 是 Little-endian ),i2 表示‘有符号的2字节整数’。例如,如果我们的数据表示单个无符号4字节小端整数,则dtype字符串将为 <u4

事实上,为什么我们不尝试呢?

1
2
3
>>> little_end_u4 = np.ndarray(shape=(1,),dtype='<u4', buffer=big_end_buffer)
>>> little_end_u4[0] == 1 * 256**1 + 3 * 256**2 + 2 * 256**3
True

回到我们的 big_end_arr - 在这种情况下我们的基础数据是big-endian(数据字节序),我们设置dtype匹配(dtype也是big-endian)。但是,有时你需要翻转它们。

标量当前不包含字节顺序信息,因此从数组中提取标量将返回本机字节顺序的整数。因此:

1
2
>>> big_end_arr[0].dtype.byteorder == little_end_u4[0].dtype.byteorder
True

更改字节顺序

从介绍中可以想象,有两种方法可以影响数组的字节顺序与它所查看的底层内存之间的关系:

  • 更改数组dtype中的字节顺序信息,以便将基础数据解释为不同的字节顺序。这是作用 arr.newbyteorder()

  • 更改基础数据的字节顺序,保留dtype解释。这是做什么的 arr.byteswap()

需要更改字节顺序的常见情况是:

  • 数据和dtype字节顺序不匹配,并且希望更改dtype以使其与数据匹配。
  • 数据和dtype字节顺序不匹配,并且希望交换数据以使它们与dtype匹配
  • 数据和dtype字节顺序匹配,但希望交换数据和dtype来反映这一点

数据和dtype字节顺序不匹配,更改dtype以匹配数据

我们制作一些他们不匹配的东西:

1
2
3
>>> wrong_end_dtype_arr = np.ndarray(shape=(2,),dtype='<i2', buffer=big_end_buffer)
>>> wrong_end_dtype_arr[0]
256

这种情况的明显解决方法是更改dtype,以便它给出正确的字节顺序:

1
2
3
>>> fixed_end_dtype_arr = wrong_end_dtype_arr.newbyteorder()
>>> fixed_end_dtype_arr[0]
1

请注意,内存中的数组未更改:

1
2
>>> fixed_end_dtype_arr.tobytes() == big_end_buffer
True

数据和类型字节顺序不匹配,更改数据以匹配dtype

如果需要内存中的数据是某种顺序,可能希望这样做。例如,可能正在将内存写入需要特定字节排序的文件。

1
2
3
>>> fixed_end_mem_arr = wrong_end_dtype_arr.byteswap()
>>> fixed_end_mem_arr[0]
1

现在数组 已 在内存中更改:

1
2
>>> fixed_end_mem_arr.tobytes() == big_end_buffer
False

数据和dtype字节序匹配,交换数据和dtype

可能有一个正确指定的数组dtype,但是需要数组在内存中具有相反的字节顺序,并且希望dtype匹配以便数组值有意义。在这种情况下,只需执行上述两个操作:

1
2
3
4
5
>>> swapped_end_arr = big_end_arr.byteswap().newbyteorder()
>>> swapped_end_arr[0]
1
>>> swapped_end_arr.tobytes() == big_end_buffer
False

使用ndarray astype方法可以更简单地将数据转换为特定的dtype和字节顺序:

1
2
3
4
5
>>> swapped_end_arr = big_end_arr.astype('<i2')
>>> swapped_end_arr[0]
1
>>> swapped_end_arr.tobytes() == big_end_buffer
False

结构化数组

介绍

结构化数组是ndarray,其数据类型是由一系列命名字段组织的简单数据类型组成。例如:

1
2
3
4
5
>>> x = np.array([('Rex', 9, 81.0), ('Fido', 3, 27.0)],
... dtype=[('name', 'U10'), ('age', 'i4'), ('weight', 'f4')])
>>> x
array([('Rex', 9, 81.), ('Fido', 3, 27.)],
dtype=[('name', 'U10'), ('age', '<i4'), ('weight', '<f4')])

x 是一个长度为2的一维数组,其数据类型是一个包含三个字段的结构:

  • 长度为10或更少的字符串,名为“name”。
  • 一个32位整数,名为“age”。
  • 一个32位的名为’weight’的float类型。

如果x在位置1处索引,则会得到一个结构:

1
2
>>> x[1]
('Fido', 3, 27.0)

可以通过使用字段名称建立索引来访问和修改结构化数组的各个字段:

1
2
3
4
5
6
>>> x['age']
array([9, 3], dtype=int32)
>>> x['age'] = 5
>>> x
array([('Rex', 5, 81.), ('Fido', 5, 27.)],
dtype=[('name', 'U10'), ('age', '<i4'), ('weight', '<f4')])

结构化数据类型旨在能够模仿C语言中的“结构”,并共享类似的内存布局。它们用于连接C代码和低级操作结构化缓冲区,例如用于解释二进制blob。出于这些目的,它们支持诸如子数组,嵌套数据类型和联合之类的专用功能,并允许控制结构的内存布局。

希望操纵表格数据的用户(例如存储在csv文件中)可能会发现其他更适合的pydata项目,例如xarray,pandas或DataArray。这些为表格数据分析提供了高级接口,并且针对该用途进行了更好的优化。例如,numpy中结构化数组的类似C-struct的内存布局可能导致较差的缓存行为。

结构化数据类型创建

结构化数据类型可以被认为是一定长度的字节序列(结构的项目大小),它被解释为字段集合。每个字段在结构中都有一个名称,一个数据类型和一个字节偏移量。字段的数据类型可以是包括其他结构化数据类型的任何numpy数据类型,也可以是子行数据类型,其行为类似于指定形状的ndarray。字段的偏移是任意的,字段甚至可以重叠。这些偏移量通常由numpy自动确定,但也可以指定。

可以使用该函数创建结构化数据类型numpy.dtype。有4种不同的规范形式, 其灵活性和简洁性各不相同。这些在 “数据类型对象” 参考页面中进一步记录,总结如下:

元组列表,每个字段一个元组

每个元组都具有以下形式(字段名称、数据类型、形状),其中Shape是可选的。 fieldname 是字符串(如果使用标题,则为元组,请参见下面的字段标题), datatype 可以是任何可转换为数据类型的对象,而 shape 是指定子数组形状的整数元组。

1
2
>>> np.dtype([('x', 'f4'), ('y', np.float32), ('z', 'f4', (2, 2))])
dtype([('x', '<f4'), ('y', '<f4'), ('z', '<f4', (2, 2))])

如果 fieldname 是空字符串 ‘’ ,则将为字段指定格式为 f# 的默认名称, 其中 # 是字段的整数索引,从左侧开始从0开始计数:

1
2
>>> np.dtype([('x', 'f4'), ('', 'i4'), ('z', 'i8')])
dtype([('x', '<f4'), ('f1', '<i4'), ('z', '<i8')])

自动确定结构内字段的字节偏移量和总结构项大小。

逗号分隔的数据类型规范字符串

在这个速记符号中,任何 字符串dtype规范 都可以在字符串中使用, 并用逗号分隔。 字段的项目大小和字节偏移是自动确定的,并且字段名称被赋予默认名称 f0、f1等。

1
2
3
4
>>> np.dtype('i8, f4, S3')
dtype([('f0', '<i8'), ('f1', '<f4'), ('f2', 'S3')])
>>> np.dtype('3int8, float32, (2, 3)float64')
dtype([('f0', 'i1', (3,)), ('f1', '<f4'), ('f2', '<f8', (2, 3))])

字段参数组字典

这是最灵活的规范形式,因为它允许控制字段的字节偏移和结构的项目大小。

字典有两个必需键 “names” 和 “format”,以及四个可选键 “offsets”、“itemsize”、“Aligned” 和 “title”。 名称和格式的值应该分别是相同长度的字段名列表和dtype规范列表。 可选的 “offsets” 值应该是整数字节偏移量的列表,结构中的每个字段都有一个偏移量。 如果未给出 “Offsets” ,则自动确定偏移量。可选的 “itemsize” 值应该是一个整数, 描述dtype的总大小(以字节为单位),它必须足够大以包含所有字段。

1
2
3
4
5
6
7
>>> np.dtype({'names': ['col1', 'col2'], 'formats': ['i4', 'f4']})
dtype([('col1', '<i4'), ('col2', '<f4')])
>>> np.dtype({'names': ['col1', 'col2'],
... 'formats': ['i4', 'f4'],
... 'offsets': [0, 4],
... 'itemsize': 12})
dtype({'names':['col1','col2'], 'formats':['<i4','<f4'], 'offsets':[0,4], 'itemsize':12})

可以选择偏移量,使得字段重叠,尽管这将意味着分配给一个字段可能会破坏任何重叠字段的数据。 作为一个例外,numpy.object类型的字段不能与其他字段重叠,因为存在破坏内部对象指针然后取消引用它的风险。

可选的“Aligned”值可以设置为True,以使自动偏移计算使用对齐的偏移量(请参阅自动字节偏移量和对齐), 就好像numpy.dtype的“Align”关键字参数已设置为True一样。

可选的 ‘titles’ 值应该是长度与 ‘names’ 相同的标题列表,请参阅下面的字段标题。

字段名称字典

不鼓励使用这种形式的规范。 字典的关键字是字段名称,值是指定类型和偏移量的元组:

1
2
>>> np.dtype({'col1': ('i1', 0), 'col2': ('f4', 1)})
dtype([('col1', 'i1'), ('col2', '<f4')])

不鼓励使用这种形式,因为Python字典在Python 3.6之前的Python版本中不保留顺序, 并且结构化dtype中字段的顺序有意义。字段标题可以通过使用3元组来指定,见下文。

操作和显示结构化数据类型

可以names 在dtype对象的属性中找到结构化数据类型的字段名称列表:

1
2
3
>>> d = np.dtype([('x', 'i8'), ('y', 'f4')])
>>> d.names
('x', 'y')

可以通过names使用相同长度的字符串序列分配属性来修改字段名称。

dtype对象还具有类似字典的属性,fields其键是字段名称(和字段标题,见下文), 其值是包含每个字段的dtype和字节偏移量的元组。

1
2
>>> d.fields
mappingproxy({'x': (dtype('int64'), 0), 'y': (dtype('float32'), 8)})

对于非结构化数组,names和fields属性都相同None。 测试 dtype 是否结构化的推荐方法是, 如果dt.names不是None 而不是 dt.names ,则考虑具有0字段的dtypes。

如果可能,结构化数据类型的字符串表示形式显示在“元组列表”表单中,否则numpy将回退到使用更通用的字典表单。

自动字节偏移和对齐

NumPy使用两种方法之一自动确定字段字节偏移量和结构化数据类型的总项目大小,具体取决于是否 align=True指定为关键字参数numpy.dtype。

默认情况下(align=False),numpy将字段打包在一起,使得每个字段从前一个字段结束的字节偏移开始,并且字段在内存中是连续的。

1
2
3
4
5
6
>>> def print_offsets(d):
... print("offsets:", [d.fields[name][1] for name in d.names])
... print("itemsize:", d.itemsize)
>>> print_offsets(np.dtype('u1, u1, i4, u1, i8, u2'))
offsets: [0, 1, 2, 6, 7, 15]
itemsize: 17

如果align=True设置了,NumPy将以与许多C编译器填充C结构相同的方式填充结构。在某些情况下,对齐结构可以提高性能,但代价是增加了数据类型的大小。在字段之间插入填充字节,使得每个字段的字节偏移量将是该字段对齐的倍数,对于简单数据类型,通常等于字段的字节大小,请参阅PyArray_Descr.alignment。该结构还将添加尾随填充,以使其itemsize是最大字段对齐的倍数。

1
2
3
>>> print_offsets(np.dtype('u1, u1, i4, u1, i8, u2', align=True))
offsets: [0, 1, 4, 8, 16, 24]
itemsize: 32

请注意,尽管默认情况下几乎所有现代C编译器都以这种方式填充,但C结构中的填充依赖于C实现,因此不能保证此内存布局与C程序中相应结构的内容完全匹配。为了获得确切的对应关系,可能需要在numpy侧或C侧进行一些工作。

如果使用offsets基于字典的dtype规范中的可选键指定了偏移量,则设置align=True将检查每个字段的偏移量是其大小的倍数,并且itemsize是最大字段大小的倍数,如果不是,则引发异常。

如果结构化数组的字段和项目大小的偏移满足对齐条件,则数组将具有该ALIGNED flag集合。

便捷函数numpy.lib.recfunctions.repack_fields将对齐的dtype或数组转换为打包的dtype或数组,反之亦然。它需要一个dtype或结构化的ndarray作为参数,并返回一个带有字段重新打包的副本,带或不带填充字节。

字段标题

除了字段名称之外,字段还可以具有关联的标题,备用名称,有时用作字段的附加说明或别名。标题可用于索引数组,就像字段名一样。

要在使用dtype规范的list-of-tuples形式时添加标题,可以将字段名称指定为两个字符串的元组而不是单个字符串,它们分别是字段的标题和字段名称。例如:

1
2
>>> np.dtype([(('my title', 'name'), 'f4')])
dtype([(('my title', 'name'), '<f4')])

当使用第一种形式的基于字典的规范时,标题可以’titles’作为如上所述的额外密钥提供。当使用第二个(不鼓励的)基于字典的规范时,可以通过提供3元素元组而不是通常的2元素元组来提供标题:(datatype, offset, title)

1
2
>>> np.dtype({'name': ('i4', 0, 'my title')})
dtype([(('my title', 'name'), '<i4')])

该dtype.fields字典将包含标题作为键,如果使用任何头衔。这有效地表示具有标题的字段将在字典字典中表示两次。这些字段的元组值还将具有第三个元素,即字段标题。因此,并且因为names属性保留了字段顺序而fields 属性可能没有,所以建议使用dtype的names属性迭代dtype的字段,该属性不会列出标题,如:

1
2
3
4
>>> for name in d.names:
... print(d.fields[name][:2])
(dtype('int64'), 0)
(dtype('float32'), 8)

联合类型

默认情况下,结构化数据类型在numpy中实现为基本类型 numpy.void, 但是可以使用 数据类型对象中 中描述的dtype规范的 (base_dtype, dtype) 形式将其他 numpy 类型解释为结构化类型。 这里,base_dtype 是所需的底层 dtype,字段和标志将从dtype复制。此 dtype 类似于 C 中的“Union”。

将数据分配给结构化数组

有许多方法可以为结构化数组赋值:使用python元组,使用标量值或使用其他结构化数组。

从Python本机类型(元组)分配

为结构化数组赋值的最简单方法是使用python元组。每个赋值应该是一个长度等于数组中字段数的元组,而不是列表或数组,因为它们将触发numpy的广播规则。元组的元素从左到右分配给数组的连续字段:

1
2
3
4
5
>>> x = np.array([(1, 2, 3), (4, 5, 6)], dtype='i8, f4, f8')
>>> x[1] = (7, 8, 9)
>>> x
array([(1, 2., 3.), (7, 8., 9.)],
dtype=[('f0', '<i8'), ('f1', '<f4'), ('f2', '<f8')])

Scalars的赋值

分配给结构化元素的标量将分配给所有字段。将标量分配给结构化数组时,或者将非结构化数组分配给结构化数组时,会发生这种情况:

1
2
3
4
5
6
7
8
9
>>> x = np.zeros(2, dtype='i8, f4, ?, S1')
>>> x[:] = 3
>>> x
array([(3, 3., True, b'3'), (3, 3., True, b'3')],
dtype=[('f0', '<i8'), ('f1', '<f4'), ('f2', '?'), ('f3', 'S1')])
>>> x[:] = np.arange(2)
>>> x
array([(0, 0., False, b'0'), (1, 1., True, b'1')],
dtype=[('f0', '<i8'), ('f1', '<f4'), ('f2', '?'), ('f3', 'S1')])

结构化数组也可以分配给非结构化数组,但前提是结构化数据类型只有一个字段:

1
2
3
4
5
6
7
>>> twofield = np.zeros(2, dtype=[('A', 'i4'), ('B', 'i4')])
>>> onefield = np.zeros(2, dtype=[('A', 'i4')])
>>> nostruct = np.zeros(2, dtype='i4')
>>> nostruct[:] = twofield
Traceback (most recent call last):
...
TypeError: Cannot cast scalar from dtype([('A', '<i4'), ('B', '<i4')]) to dtype('int32') according to the rule 'unsafe'

来自其他结构化数组的赋值

两个结构化数组之间的分配就像源元素已转换为元组然后分配给目标元素一样。也就是说,源数组的第一个字段分配给目标数组的第一个字段,第二个字段同样分配,依此类推,而不管字段名称如何。具有不同数量的字段的结构化数组不能彼此分配。未包含在任何字段中的目标结构的字节不受影响。

1
2
3
4
5
6
>>> a = np.zeros(3, dtype=[('a', 'i8'), ('b', 'f4'), ('c', 'S3')])
>>> b = np.ones(3, dtype=[('x', 'f4'), ('y', 'S3'), ('z', 'O')])
>>> b[:] = a
>>> b
array([(0., b'0.0', b''), (0., b'0.0', b''), (0., b'0.0', b'')],
dtype=[('x', '<f4'), ('y', 'S3'), ('z', 'O')])

涉及子数组的分配

分配给子数组的字段时,首先将指定的值广播到子数组的形状。

索引结构化数组

访问单个字段

可以通过使用字段名称索引数组来访问和修改结构化数组的各个字段。

1
2
3
4
5
6
7
>>> x = np.array([(1, 2), (3, 4)], dtype=[('foo', 'i8'), ('bar', 'f4')])
>>> x['foo']
array([1, 3])
>>> x['foo'] = 10
>>> x
array([(10, 2.), (10, 4.)],
dtype=[('foo', '<i8'), ('bar', '<f4')])

生成的数组是原始数组的视图。它共享相同的内存位置,写入视图将修改原始数组。

1
2
3
4
5
>>> y = x['bar']
>>> y[:] = 11
>>> x
array([(10, 11.), (10, 11.)],
dtype=[('foo', '<i8'), ('bar', '<f4')])

此视图与索引字段具有相同的dtype和itemsize,因此它通常是非结构化数组,但嵌套结构除外。

1
2
>>> y.dtype, y.shape, y.strides
(dtype('float32'), (2,), (12,))

如果访问的字段是子数组,则子数组的维度将附加到结果的形状:

1
2
3
4
5
>>> x = np.zeros((2, 2), dtype=[('a', np.int32), ('b', np.float64, (3, 3))])
>>> x['a'].shape
(2, 2)
>>> x['b'].shape
(2, 2, 3, 3)